INDEX
Introduction
The first 12 pages of this user guide are the User Sections and cover general user tasks. These pages should be made available to everyone using TroopKit.
The Creating and Managing Items part explains which tasks can be done by specific roles and how to do those tasks.
The Administering TroopKit part is to show the administrator, unit leader, and scout leader how to do their unique tasks.
TrooopKit does not replace Troopmaster, Packmaster, or other advancement tracking systems.
Advancement tracking is an adult-centric task.
TroopKit is scout-centric - handing responsibility to scouts for tasks they are capable of and should be doing. For Cub Scout units, adults can perform the managerial tasks.
In this document "unit" refers to Packs, Troops, and Crews that use TroopKit.
TroopKit offers a unit calendar with event scheduling and automatic reminders. The difference between TroopKit and other calendar tools is that TroopKit allows responsibility to be pushed to scouts, rather than controlled by a few adults. This helps promote a scout-run unit for the day-to-day operations while allowing adult volunteers to assist as needed. Parents, scouts, and other unit volunteers can see information about upcoming events by visiting the website, or checking their email.
Your TroopKit administrator will decide which features will be used by your unit. Your admin will also configure the interface and create user accounts.
When pages are printed from TroopKit, they look much different than what is displayed on your computer screen. The navigation is removed so you print only the important content needed offline. This makes duty rosters, menus, meeting plans, and other pages look clean when printed.
Logging In
- You will receive an access code and username/password from your administrator.
- In your web browser's address field, enter: https://www.TroopKit.com
- You will see the screen shown here.
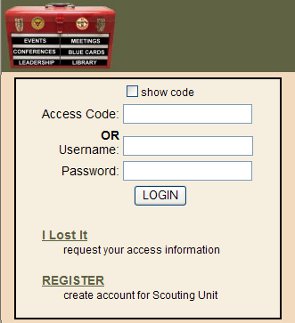
- Enter your access code in the "Access Code:" field OR your username and password in the appropriate fields.
- Click the "LOGIN" button.
- If you forget or misplace your access code or password, click the "I Lost It" link and enter your email address or username on the displayed page.
- If you forget which email address or username is used for your access to TroopKit, contact your TroopKit administrator.
- When you successfully log on, you can navigate the site.
Site Navigation
The main navigation links are across the top of your screen when you log in.

If your unit doesn't use some features, such as Library, Gear, or Communications, those links will not exist.
- Home - returns you to your main page, displaying your calendar, events, and meetings.
- Events - displays list of upcoming events to which you are invited.
- Meetings - displays list of upcoming meetings to which you are invited.
- Advancement - allows scouts to manage awards earned, request blue cards, conferences, or boards of review.
- Library - lists all books which can be checked out.
- Gear - lists equipment and who has it.
- Communications - form to send simple messages to others in your unit.
- Help - links to this user guide, as well as requests for technical aid or unit help.
Links are bold, underlined text - either white on dark green background or dark on tan background.
Home
When users log on, their home page shows all upcoming activity at a glance, both in calendar and list layouts. Parents see activities that pertain to their own account as well as all the scouts in their family.
Most pages have a [Show Instructions] button at the top. When first using TroopKit, it's a good idea to turn instructions ON by clicking the button. The extra text will help you understand what is available.
On the Home page, your personal configuration settings are displayed. Click the icon under "Update" to view and modify your information.
If you change your email incorrectly, you will no longer receive information from TroopKit.
If your unit is using the Scout Challenge feature, a My Challenges section will appear. This lists current and past challenges in which you can participate. Click the challenge name to view your progress and complete tasks.
My Calendar shows your calendar of events and meetings.
Red dates indicate something requiring your attention. Other, more subdued, colors show scheduled activities to which you are invited.
You can press the "<" or ">" next to the month name to move to the previous or next month. Activities in the past are not displayed.
My Events, My Meetings, and My Conferences show calendar entries in a list form.
Notice that all event, meeting, and conference names are links that take you to the page of details for that activity.
If you use a scheduler or calendar, you can add activities using the links in the "Calendar" column. Click "G" to add it to your Google calendar, "Y" to add it to your Yahoo calendar, "M" to add it to your MSN calendar, "iC" for iCal format, or "vC" for an older vCal format.
Events
Events are activities which require permission from a parent for a scout to attend and typically cost money. Scouts can request to attend an event
but a parent must grant permission. A scout can decline an event by himself.
On this page, all events to which you are invited are listed by date. Parents see events for themselves and all scouts in their family.
All events that concern you are displayed with your current status and the start and return times.
Click the event name to view details of the event and sign up yourself or your scout.
The "Status" indicates if you have signed up for the event, declined the event, or not replied about the event. For parents, this is your status, not your scout's status.
Click the Return time to open a small window that updates automatically with changes in the return time. This is useful if you are a parent using your computer around the time your scout is to return. You can see if the scouts will be early or late.
[Past Events] button lets you view previous event information. This is useful for tracking attendance and collecting payments.
[Manage Events] button lets you manage Events.
If you use a scheduler or calendar, you can add activities using the links in the "Calendar" column. Click "G" to add it to your Google calendar, "Y" to add it to your Yahoo calendar, "M" to add it to your MSN calendar, "iC" for iCal format, or "vC" for an older vCal format.
Individual Event
Click the event name to view details of the event or to sign up.
- Roster - printable roster with emergency phone numbers. Print before the outing and check off the names as expected scouts show up. You can display everyone, or only those signed up. You can export the roster as an Excel document.
-
Agenda - printable agenda of the event. Print before the outing so you know the schedule of activities.
-
Attendance - view or update attendance after an event.
-
Send Mail - contact the people that have signed up, declined, or not responded yet.
-
Copy Event - save time when creating another event very similar to an existing event.
-
Map - opens new window to Google Maps for the location defined for this event.
-
Weather - shows national weather service forecast for event location.
-
Duties - printable duty roster for scouts in specific patrol/den. The duty roster is randomly created for each event based on the scouts signed up so the same scouts don't get the same jobs every campout. There is also a link to a blank duty roster form that the scouts can fill in if they prefer.
-
Menu - shows menu for the group. Members of the group can modify the menu, everyone can view it.
Signing Up - find your name or your scout's name in the list of patrols/dens and adults. The names you can click will be bold and underlined. Click the person you want to register and the following page will be displayed.
A scout can decline an event with no parent involvement. If a scout requests to sign up for an event, a message is sent to their parents so they can confirm or deny the registration. Permission from a parent is required for events.
Parents can register or decline an event for themselves and any scouts in their family.
Depending on the event, there may be multiple sign-up options and prices. Choose the option you want, enter special notes and emergency phone number if you wish, and submit.
You can change your registration up until the deadline. After that date, a request to sign-up or change registration will cause a message to be sent to the administrator for authorization.
Some events may allow you to sign up for multiple options. For example, a service project or fundraiser with multiple time slots may let you sign up for more than one time. Or, a ski trip may allow you to sign up, and rent skis, and rent a helmet.
Meetings
Meetings are routine activities requiring no registration nor permission from parents.
On this page, all events to which you are invited are listed by date. Parents see events for themselves and all scouts in their family.
Upcoming meetings to which you are invited are listed by date. Click the meeting name to view or change details.
Select a meeting type and click the [Create Meeting Plan] to add a meeting, or the [Print Blank Plan] for a paper planning sheet.
Anyone can modify the agenda for a meeting or create a new meeting.
The [View Past Plans] button allows you to review recent meetings.
The [Create Meeting Plan] button lets you make a meeting agenda.
If you use a scheduler or calendar, you can add activities using the links in the "Calendar" column. Click "G" to add it to your Google calendar, "Y" to add it to your Yahoo calendar, "M" to add it to your MSN calendar, "iC" for iCal format, or "vC" for an older vCal format.
Anyone can update, copy, or delete a meeting plan. Copying a meeting plan is helpful when creating a schedule of similar meetings, such as troop meetings. These actions are tracked in the database by the unit administrator.
Anyone can send mail to everyone invited to a meeting, with the option to include the agenda in the message.
Attendance can be managed by the admin, unit leader, senior patrol leader, or scribe for unit meetings. Any patrol/den member can manage the attendance of a patrol/den meeting.
Advancement
For Boy Scouts to progress through ranks, they need to complete merit badges, have a Scoutmaster conference, and complete a Board of Review.
Cub Scouts do not advance through ranks, but do earn different badges based on their age class.
The Advancement section allows scouts to record their awards and request advancement checkpoints. There are four parts - Awards, Blue Cards, Scoutmaster Conference, and Board of Review.
Awards is a 'vanity' page that displays awards and dates earned. Choose a scout, patrol, or specific award to show.
Each scout can enter dates as he earns awards.
He can see which awards other scouts have earned and set goals to earn certain awards.
Blue Card allows Boy Scouts to easily request merit badge progress cards, refered to as blue cards.
The scout chooses the merit badge of interest, enters the name of a buddy, and chooses or enters the merit badge counselor name if known.
An email request is sent to the troop's advancement email address.
Scoutmaster Conference allows the scoutmaster to set up office hours when s/he will be available for scouts to request conferences.
The page displays available times for the upcoming two weeks.
Scouts choose a reason to meet and the desired time. This reserves the spot and sends an email to the scoutmaster, scout, and parents.
The scout can click their name in the reserved spot to cancel the conference request.
Board of Review allows scouts to request a board of review with members of the troop committee.
The scout chooses the reason to meet. An email request is sent to the troop's advancement email address.
Library
The library keeps track of valuable resources used for the scouting program. By making all resources easily accessible, they get used more often resulting in a better program.
In a troop, a scout has the responsibility of maintaining the troop library. In a pack, this may be an adult.
When you click the "Reserve" link by a book, an email is sent to the librarian requesting the book and the status is set to "Requested".
The librarian hands over books, and changes the status to "Delivered".
When a book is returned, the librarian makes it available again.
The librarian can also add and delete books in the library, as well as create new books as needed.
Communications
TroopKit automatically keeps people in your unit informed about activities, but there will be times when you want to send a message to another person, a group, or the entire unit. The Communications area lets you create a simple message and email it to as many groups and individuals as you want.
Type in your message, select the people to receive it, and send it.
You can upload files to the server and include a link to the files in your message, but no attachments are allowed in messages.
Messages are limited to 5000 characters.
Gear
Equipment is essential for a quality scouting program and ensuring everyone knows what gear is available, how to use it, and how to care for it is the quartermaster's job. In a troop, a scout has the responsibility of managing equipment. In a pack, this may be an adult.
Anyone can view equipment and who has each item. Pieces of gear may be assigned to a specific patrol/den, or may be for general unit use.
Unit Gear - items for general use by anyone in the unit can be checked out by individuals.
When you click the "Reserve" link by an item, an email is sent to the quartermaster requesting the item and the status is set to "Requested".
The quartermaster distributes gear and changes the status to "Delivered".
When gear is returned, the quartermaster makes it available again.
Patrol Gear - items that have been assigned to a patrol by the quartermaster can not be checked out by individuals. Only the patrol leader, quartermaster, unit leader, or admin can assign that item to an individual. This allows the patrol leader to manage a patrol's gear.
The patrol leader can click "Assign" and select the person responsible for that piece of gear.
The patrol leader can click the scout's name to reassign the item to someone else.
The patrol leader can click "Return" to put the item back in the patrol's open inventory.
The quartermaster can also add and delete gear to the unit inventory, as well as create new types of gear as needed.
Scout Challenge
If your unit is using the Scout Challenge feature, the challenge will be listed on your Home page. Click the challenge name to access the challenge.
Use this page to track your progress through the challenge items. Enter the date when you complete each item until you've met the requirements.
The unit leader and administrator can track your progress and will know when you have completed a challenge.
Creating and Managing
All users of TroopKit can manage some items. Other items are restricted to people in specific roles.
- Unit Leader is Scoutmaster, Cubmaster, or Advisor.
- SPL is the Senior Patrol Leader of a troop.
- Librarian, Quartermaster, and Scribe roles can be assigned to both scouts and adults.
| Task | Admin | Unit
Leader | SPL | Librarian | Quartermaster | Scribe | All
Users |
| Events | X | X | X | X | X | X | X |
| Meetings | X | X | X | X | X | X | X |
| Attendance | X | X | X | | | X | |
| Library | X | X | X | X | | | |
| Gear | X | X | X | | X | | |
| Groups | X | X | X | | | | |
| Patrols | X | X | X | | | | |
| Scouts | X | X | X | | | | |
| Positions | X | X | X | | | | |
| Adults | X | X | | | | | |
| Locations | X | X | | | | | |
| Conference Times | X | X | | | | | |
| Counselors | X | X | | | | | |
| Awards | X | X | | | | | |
| Challenges | X | X | | | | | |
| Messages | X | X | | | | | |
| Unit Profile | X | | | | | | |
| Tracking | X | | | | | | |
| Setup | X | | | | | | |
Events
Clicking the [Manage Events] button on the event listing page allows you to modify existing events or create new events.
New events can be created by anyone by clicking the [Add New Event] button.
Most items are obvious, but here are a few tips:
- Location - select the location of the event or create a new location.
-
Reminder - Check this to give one last prompt to people that neglect to sign up until the last minute.
-
Options - Allow people to choose a single option, or multiple options. An event starts with one option. You can add additional options incrementally, creating as many as needed. Each time you save the event, another New option is offered.
-
Support Files - upload files to the server or link to them on other websites. These might be activity waivers, maps, packing lists, or other required information.
When you are finished entering data and have reviewed the event, send a message to your TroopKit administrator or unit leader letting him know the event should be activated so people can sign up.
Meetings
Various types of meeting plans can be created by anyone. Choosing Troop/Pack, Patrol/Den, PLC, or Committee meeting uses a defined template which you can modify. Choosing Board of Review or Other type meeting uses a freeform template in which you define each part of the meeting. There can be up to 10 sections in a meeting.
Most data fields are obvious, but here are a few tips:
- Location - can be the unit's default location, any scout's home, or any location used by the unit. A new location can be created.
-
Meeting Sections - common titles are set by default, but you can change them. Define a length and leader for each section.
Attendance
The Scribe and other authorized leaders will see an [Attendance] button on Event and Meeting pages.
On this page, each participant in the event or meeting can be checked off, saved, and printed.
Library
The librarian is responsible for distributing books to scouts and for maintaining the unit's library.
The librarian has a slightly different view of the Library than other users and can manage books.
The librarian can check out a book like any user by clicking the Reserve link for a book. The librarian has additional functions:
-
Checked Out - clicking this button displays only books that are currently checked out or requested. This shorter list can be used by the librarian to track down past due books.
-
Manage Library - the librarian uses this button to add and delete books in the library.
-
Deliver - clicking this link for a book changes its status to 'delivered'. This should be done when the librarian hands over the book.
-
Return - when a book is returned to the librarian, s/he clicks this link to change its status to 'available' for others to check out.
After clicking the [Manage Library] button, the librarian can:
-
Delete - clicking the red icon in the Delete column, removes a copy of the book from the library.
-
Add Book - clicking the [Add Book] button displays a new page where books can be added to the library.
After clicking the [Add Book] button, the librarian can:
-
Add to Library - checking this box for a listed book creates another instance of the book in the library. This allows multiple copies of the same book to be available in the library with each one being distinguished automatically as #1, #2, ...
-
Delete - most books are globally available to all units, but books that this unit has specifically created can be deleted. These books have a small red delete icon in front of their title.
-
Create Book - clicking the [Create Book] button allows the librarian to define a new book.
After clicking the [Create Book] button, the librarian can define a new book. Choose the type of book so it is displayed with other books of the same type. Enter a title and add an optional ISBN # and/or BSA #, if desired.
This defines the book, but copies of it still need to be added to the library as described earlier.
Gear
The quartermaster is responsible for managing the unit's equipment. There are many different ways to manage the equipment and the TroopKit Gear area is flexible enough to handle most of them.
Some units keep all equipment in a trailer or central storage area and items are checked out as needed.
Other units distribute equipment to patrols/dens and the leader assigns items to individuals as needed.
Still other units assign equipment to individual scouts to keep and maintain.
The quartermaster can check out gear like any user by clicking the Reserve link for an item. The quartermaster has additional functions:
-
Manage Gear - the quartermaster uses this button to add and delete pieces of gear.
-
Assign - clicking this link for an item allows the quartermaster to assign the item to any person or patrol. Clicking an underlined person's name does the same thing.
-
Deliver - when a piece of general unit equipment is requested, the quartermaster delivers it from storage to the requestor. When this happens, the quartermaster changes the status to 'delivered'.
-
Return - when gear is returned to the quartermaster, s/he clicks this link to change its status to 'available' for others to check out.
After clicking the [Manage Gear] button, the quartermaster can:
-
Update - clicking the green icon in the Manage column, lets the quartermaster change the label or description of the item.
-
Delete - clicking the red icon in the Manage column, removes the item from inventory.
-
Add Gear - clicking the [Add Gear] button displays a new page where items can be added to inventory.
After clicking the [Add Gear] button, the quartermaster can define a new piece of gear. The quartermaster chooses the type of gear, or creates a new type if needed, and then enters a label and description to distinguish this item from other items in inventory.
Here are some other tips about the Quartermaster area:
-
General unit gear can be requested by anyone which sends an email to the quartermaster and sets its status to 'requested'.
-
Gear that is assigned to a patrol can only be assigned to a scout by the patrol leader or quartermaster - it can not be requested by a scout.
-
Patrol leaders manage the gear assigned to their patrol by assigning items to scouts. This can be done long-term or for each campout.
-
The [Request Unlisted] button allows people to ask for items that are not in the inventory. This may be new gear requests or consumables, such as fuel, soap, or towels.
Administration
 When the TroopKit administrator, the person defined as the unit leader, or the scout defined as the Troop SPL or Crew President log on, they have an Administrative Navigation list on the left side of the screen. Depending on their role and the features enabled by the administrator, the contents of this list change.
-
The scout leader can administer the items with a RED dot.
-
The unit leader can administer the items with a ORANGE dot.
-
The administrator can administer the items with a GREEN dot.
-
Only the tasks that can be done are listed - for example, 'Tracking' will not appear when logged on as the unit leader.
Each of these administrative tasks are described in the following sections.
Scouts
The SPL, unit leader, and administrator can manage scouts.
Scouts are only created and deleted by the unit leader or administrator.
The SPL can move a scout between patrols and assign positions in the unit as needed.
-
Check the appropriate box to make the scout a patrol leader or assistant.
-
Click the green icon under Manage to change the scout's information.
-
The unit leader and administrator can resend the scout's access code, send a new code, or delete the scout.
-
The parent names are links to administer adults.
-
The [Add New Scout] button is used to add scouts to the unit.
The SPL can only change a scout's Patrol and Position.
The unit leader and admin can modify any of the scout's information.
Patrols/Dens
The SPL, unit leader, and administrator can manage patrols/dens.
This includes creating and deleting patrols, as well as assigning a name, emblem, scout leaders, and adult leaders.
Click the patrol name to modify the patrol's information.
Click a person's name to administer that person - the SPL can not administer adults.
Click the red delete icon to remove the patrol.
Enter a new patrol name. Change the patrol's patch. Click the circle in front of the appropriate name for the scout leader and his assistant.
Change the adult leader names.
Add more scouts to the patrol/den - this links to the Manage Scouts page.
Groups
The SPL, unit leader, and administrator can create, modify, and delete groups for easier communication and invitations to events and meetings.
A group may contain individual people or other groups that contain only people - nesting of groups is not supported.

All groups are listed with their members. Members may be other groups or individuals.
Click the green icon under Manage to modify the group, or the red icon to delete the group.
Click the [Add New Group] button to creat a new group.
Enter or change the group name.
Select the groups, scouts, and adults you want in the group.
(only groups that have no groups as members are listed to prevent nested groups.)
Adults
The unit leader and administrator can manage adults.

-
Click the green icon under Manage to change the adult's information.
-
Resend the adult's access code, generate a new code, or delete the adult using the envelope, key, and delete icons.
-
The scout names are links to administer scouts.
-
The [Add New Adult] button is used to add adults to the unit.
Modify the adult's name, email, or role in the unit.
Locations
The unit leader and administrator can manage locations. Locations are used when creating events or meetings.

Add, modify, or delete a location.
The yellow triangle icon is used to define the default location for the unit. This would be where your unit normally meets.
Conferences
The unit leader and administrator can manage conference reasons, times, and exceptions.
This is mainly used for Scoutmaster Conferences in a troop.
The configuration set here will be viewed by scouts on the Conference page inside the Advancement section of TroopKit.

There are a list of reasons for conferences available to all units. In addition, you can create your own custom reasons. Enter the reason and click the [Add Reason] button. That reason now appears in the list.
To change or remove one of your custom reasons, select it in the list and click the appropriate button.
Define the times you will be available for conferences by checking the box for each time and day of week.
The Exceptions are dates which you will not be available for conferences. Checking these dates overrides the available times so scouts will not be able to request a conference for any times on these dates.
Counselors
The unit leader and administrator can manage merit badge counselors. This is mainly used in a troop.
The configuration set here will be viewed by scouts on the Blue Card page inside the Advancement section of TroopKit.
Select the adult name from the list.
Click the checkbox in front of each merit badge for which he is a counselor.
Awards
The unit leader and administrator can manage awards for use on the scout vanity page in the Advancement section of TroopKit.
An extensive list of Cub Scout, Boy Scout, and Venturing awards is available, but you can also create custom awards for your unit.

All the awards currently available for your scouts to track are listed.
Click the delete icon to remove an award from the list available to scouts.
All known awards are listed.
Check the box in front of an award to make it available on your socuts' vanity page.
Click the [Create Award] button to make a custom award for your unit.
Challenges
The unit leader and administrator can manage challenges for the unit. Challenges are a set of tasks from which a person must do a certain number in order to complete the challenge. Typically, challenges are for a calendar year, with those that complete the challenge receivine a patch the first time and then a year pin each additional time.
Challenges must be activated before people can participate in them.
Click the name of a challenge to change its configuration.
Click the [Create New Challenge] button to get started.
You can order patches and pins for those that complete your challenge.
To create or edit a challenge, all the data fields are fairly obvious.
You must activate a challenge for it to appear on the home page of users.
A challenge for adults will not appear when a scout logs on. Tasks specifically for adults will not show on a scout's challenge. It is usually better to create separate challenges for scouts and adults, but you can create a single challenge for both.
There is a wide range of tasks which you can add to your challenge, and you can create custom tasks just for your unit.
Remember to active the challenge after it is configured.
Unit Profile
The administrator can configure the entire unit's presence on TroopKit. This includes turning the many features on or off and defining the unit contacts.
The unit's number, city, and state can not be changed because this uniquely identifies the unit. Contact the TroopKit support to change this information.
Information for your unit that you may configure:
-
Primary Email - all administrative messages are sent to this address. This should be the person in your unit responsible for TroopKit - often the unit leader.
-
Advancement Email - the address of your advancement chairperson. When a Board of Review is requested, the email goes here.
-
Merit Badge Email - requests for Blue Cards are sent to this address.
-
Permission Text - use the default text or enter your own. This is displayed on event sign-up pages so parents are agreeing to this verbage when allowing a scout to attend and event.
-
Return Password - someone can use the Return Times feature to remotely update the time you expect to get back from an event. This is the password to give to that person rather than giving the administrator's access code.
-
Change Admin Code - click this to create a new administrator access code and have it sent to the Primary Email address. Use this if someone that knows the code leaves the unit.
TroopKit includes many optional features which individual units decide to use or not. Enable or disable each of these features:
-
Meetings - a key part of TroopKit which should be turned on.
-
Advancement - includes scout vanity pages to show off awards.
-
Library - if your unit has any books or other materials that get lent to people, use the library to track them.
-
Gear - keep track of camping equipment and anything else that gets distributed or lent to scouts and adults.
-
Scout Challenge - a custom challenge each year makes your unit more fun and unique. Scouts like to collect patches and pins.
-
Worksheet - (troops only) use this if you'd like scouts to put a little thought into what you will discuss at a conference beforehand so the chat is more meaningful.
-
Agendas - each event can have a detailed agenda which can be printed. It is useful for scouts to keep on schedule and know what the event includes.
-
Menus - each patrol/den can enter each meal. This allows others in the patrol to know what's to eat and lets the scout and unit leaders review meals to ensure they are appropriate.
-
Scout Accounts - if money is stored in individual scout accounts, this modifies the event sign-up pages.
-
Groups - in order to create groups other than patrols/dens, this should be enabled. This allows you to create groups of scouts eligible for high adventures, or all scouts of a certain rank, or a leadership team. These groups appear in events, meetings, and general communication.
-
Communications - enable this so people can easily send messages to others in your unit without knowing their email address. This has become a very often used feature of TroopKit.
-
Reply All - a message sent to many people through TroopKit uses BCC in the email which does not list the recipients' addresses. This is safer, but does not allow replies to everyone that received the original message. Enable this to use CC which shows everyone's addresses and allows a reply to all. (Messages with more than 50 recipients never use CC.)
-
PLC Group - (troops only) as positions of responsibility are assigned to scouts, they automatically become part of the PLC group. This removes the burden of maintaining this list for the administrator.
-
Public View - if you would like to embed your unit's TroopKit calendar on your website, enable this.
-
Domain Name - if you require authentication of users on your unit's website and would like to streamline the access to TroopKit, enter your unit's website URL here. Read details about configuring this on TroopKit.
Messages
All messages sent through TroopKit are stored so the administrator can check for improper use.
Individual messages can be purged with the delete icon.
All stored messages are purged by clicking Delete All link.
Tracking
The administrator can view changes made to data by other people. This tracking of transactions can be used to identify improper use of the system by people in the unit, such as deleting things or entering improper text into the database.
Click the [Delete All] button to clear out messages.
TroopKit Configuration Tips
When setting up TroopKit for your unit, the following may be helpful:
-
If you use TroopMaster, send a CSV file of your scouts and we will load them for you.
-
Create patrols/dens first.
-
Create scouts along with parents.
-
Create adults that have no scouts in the unit.
-
Create the unit's default location where it holds meetings.
-
Have scoutmaster configure conference times.
-
Create a Scout Challenge so it appears on home pages when people log on.
-
Plan a training session to teach the SPL, patrol leaders, librarian, quartermaster, scribe, and adult leaders how their roles work.
|